Jetson Nano
本文主要用于记录,基于Jetson Nano开发板上应用于无人驾驶小车的系统开发流程,主要包括镜像制作、环境配置、硬件驱动等。
1. 镜像制作
-
镜像下载
重点提醒:JetsonNano处理器架构是aarch64架构,所以在jetson nano上安装软件时请选择arrch64版本的,否则会导致无法预料的严重后果。 arm64和aarch64之间的区别:arm64已经与aarch64合并,因为aarch64和arm64指的是同一件事。ARM64是由Apple创建的,而AARCH64是由其他人(最著名的是GNU / GCC的)创建的。用于aarch64的Apple后端称为arm64,而LLVM 编译器社区开发的后端称为aarch64(因为它是64位ISA的规范名称),后来将arm64和 aarch64 两者合并,现在的后端称为aarch64。-
镜像文件
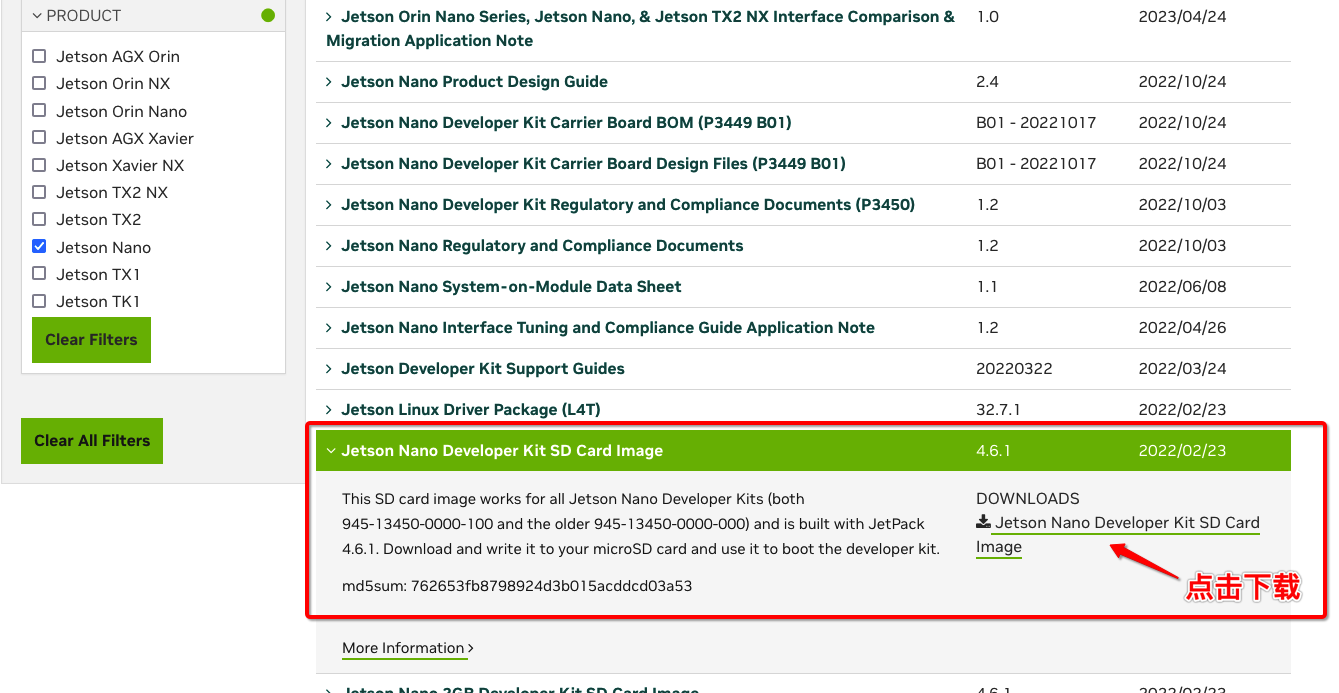
下载完成后本地会保存为后缀为.zip的文件
-
-
格式化SD卡
初始化一张大于32GB的SD卡,并对其进行格式化,格式可以为exFAT -
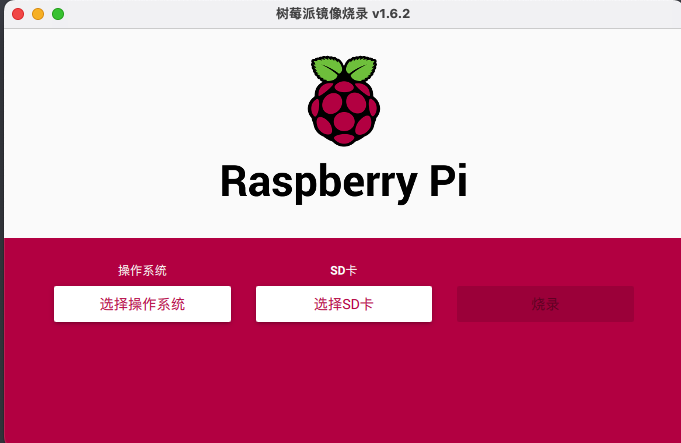
镜像烧录
文章以Mac OS系统为例进行镜像的烧录,下载树莓派镜像烧录软件,软件安装完成后,操作系统选项里点击使用自定义镜像并选择已下载的镜像文件,SD卡选项选择要进行烧录的SD卡即可,设置完成后点击烧录按钮镜像的烧录,等待完成即可。
2. 环境配置
-
修改环境变量
Jetson Nano利用官方镜像进行安装后,系统已经安装好了JetPack,cuda,cudaa,OpenCV等组件,需要修改下环境变量才可以使用。
利用gedit打开 ~ 路径下.bashrc文件:
sudo gedit ~./bashrc文件的最后添加以下三行:
export PATH=/usr/local/cuda-10.2/bin:$PATH

export LD_LIBRARY_PATH=/usr/local/cuda/lib64:$LD_LIBRARY_PATH

export CUDA_HOME=$CUDA_HOME:/usr/local/cuda-10.2
重新执行.bashrc文件,直接生效;
source ~./bashrc
输入nvcc -V命令进行测试,如果显示如下信息,证明修改正确。
nvcc -V nvcc: NVIDIA (R) Cuda compiler driver Copyright (c) 2005-2019 NVIDIA Corporation Built on Wed_Oct_23_21:14:42_PDT_2019 Cuda compilation tools, release 10.2, V10.2.89 -
更换国内镜像源
NVIDIA官方提供的Linux镜像版本为Ubuntu 18.04 LTS,镜像默认的是Ubuntu官方源,在国内使用该源下载程序时速度较慢,所以需要更换。
首先,打开/etc/apt/sources.list文件,注释原内容
sudo gedit /etc/apt/sources.list在末尾添加下述内容(以清华大学镜像源为例,注意镜像源需要支持arm64架构)
# 默认注释了源码镜像以提高 apt update 速度,如有需要可自行取消注释
deb https://mirrors.tuna.tsinghua.edu.cn/ubuntu-ports/ bionic main restricted universe multiverse
# deb-src https://mirrors.tuna.tsinghua.edu.cn/ubuntu-ports/ bionic main restricted universe multiverse
deb https://mirrors.tuna.tsinghua.edu.cn/ubuntu-ports/ bionic-updates main restricted universe multiverse
# deb-src https://mirrors.tuna.tsinghua.edu.cn/ubuntu-ports/ bionic-updates main restricted universe multiverse
deb https://mirrors.tuna.tsinghua.edu.cn/ubuntu-ports/ bionic-backports main restricted universe multiverse
# deb-src https://mirrors.tuna.tsinghua.edu.cn/ubuntu-ports/ bionic-backports main restricted universe multiverse
deb https://mirrors.tuna.tsinghua.edu.cn/ubuntu-ports/ bionic-security main restricted universe multiverse
# deb-src https://mirrors.tuna.tsinghua.edu.cn/ubuntu-ports/ bionic-security main restricted universe multiverse

# 预发布软件源,不建议启用
# deb https://mirrors.tuna.tsinghua.edu.cn/ubuntu-ports/ bionic-proposed main restricted universe multiverse
# deb-src https://mirrors.tuna.tsinghua.edu.cn/ubuntu-ports/ bionic-proposed main restricted universe multiverse
保存并关闭文件,然后输入以下命令来更新源:
sudo apt-get update其它部分常用镜像源:
中科大镜像源:
# 默认注释了源码镜像以提高 apt update 速度,如有需要可自行取消注释
deb http://mirrors.ustc.edu.cn/ubuntu-ports bionic main restricted universe multiverse
# deb-src http://mirrors.ustc.edu.cn/ubuntu-ports bionic main restricted universe multiverse
deb http://mirrors.ustc.edu.cn/ubuntu-ports bionic-updates main restricted universe multiverse
# deb-src http://mirrors.ustc.edu.cn/ubuntu-ports bionic-updates main restricted universe multiverse
deb http://mirrors.ustc.edu.cn/ubuntu-ports bionic-backports main restricted universe multiverse
# deb-src http://mirrors.ustc.edu.cn/ubuntu-ports bionic-backports main restricted universe multiverse
deb http://mirrors.ustc.edu.cn/ubuntu-ports bionic-security main restricted universe multiverse
# deb-src http://mirrors.ustc.edu.cn/ubuntu-ports bionic-security main restricted universe multiverse

# 预发布软件源,不建议启用
# deb http://mirrors.ustc.edu.cn/ubuntu-ports bionic-proposed main restricted universe multiverse
# deb-src http://mirrors.ustc.edu.cn/ubuntu-ports bionic-proposed main restricted universe multiverse
阿里源:
# 默认注释了源码镜像以提高 apt update 速度,如有需要可自行取消注释
deb https://mirrors.aliyun.com/ubuntu-ports/ bionic main restricted universe multiverse
# deb-src https://mirrors.aliyun.com/ubuntu-ports/ bionic main restricted universe multiverse
deb https://mirrors.aliyun.com/ubuntu-ports/ bionic-updates main restricted universe multiverse
# deb-src https://mirrors.aliyun.com/ubuntu-ports/ bionic-updates main restricted universe multiverse
deb https://mirrors.aliyun.com/ubuntu-ports/ bionic-backports main restricted universe multiverse
# deb-src https://mirrors.aliyun.com/ubuntu-ports/s bionic-backports main restricted universe multiverse
deb https://mirrors.aliyun.com/ubuntu-ports/ bionic-security main restricted universe multiverse
# deb-src https://mirrors.aliyun.com/ubuntu-ports/ bionic-security main restricted universe multiverse

# 预发布软件源,不建议启用
# deb https://mirrors.aliyun.com/ubuntu-ports/ bionic-proposed main restricted universe multiverse
# deb-src https://mirrors.aliyun.com/ubuntu-ports/ bionic-proposed main restricted universe multiverse
3. pip安装
sudo apt-get install python3-pip python3-dev
更新pip,保证是最新版本
pip3 install --upgrade pip
4. Jtop安装
-
依赖安装
sudo apt-get install git cmake sudo apt-get install python3-dev sudo apt-get install libhdf5-serial-dev hdf5-tools sudo apt-get install libatlas-base-dev gfortran -
安装jtop
sudo -H pip3 install -U jetson-stats
5. 安装Tensorflow
-
安装依赖库
sudo apt install python3-scipy -y
sudo apt install python3-pandas -y
sudo apt install python3-sklearn -y
sudo apt install python3-seaborn -y
安装一些其他依赖
sudo apt-get install libhdf5-serial-dev hdf5-tools libhdf5-dev zlib1g-dev zip libjpeg8-dev -
安装numpy
需要先升级 protobuf 版本至 3.3.0:
sudo pip3 install protobuf==3.3.0安装 numpy:
sudo pip3 install -U numpy==1.16.1注意这里numpy的版本,太高或者太低多多少少都会导致一些后面安装的问题,如果不指定版本,默认安装1.19.5版本会导致后面装h5py的时候报非法指令的错误。
-
安装h5py
这个包对依赖的版本要求真的非常高!出了各种各样的问题,最终选择下载源文件手动安装
笔记本在清华的镜像软件源下载h5py==2.10.0(h5py-2.10.0.tar.gz)Links for h5py (tsinghua.edu.cn)
下载完成用U盘拷贝到nano中
在nano里面解压文件,并在对应文件夹中(文件夹可以看到setup.py)打开终端
注意!在安装前先要安装Cython==3.0.0a10!如果有Cython也要保证版本一致!
sudo pip3 install -U Cython==3.0.0a10接着运行setup.py来装h5py,注意这里的python3不能少,否则系统默认是2.7的版本,会找不到Cython
sudo python3 ./setup.py install一段漫长的编译以后,h5py==2.10.0就装好了!
-
安装keras-applications包
sudo pip3 install -U keras-applications -
安装future包
sudo pip3 install -U future -
安装 setuptools 和 testresources 包
sudo pip3 install -U setuptools testresources -
检查相应库的版本
最后检查一遍相应库的版本看是否满足安装 Tensorflow 的条件。
检查相应库的版本:
pip3 list安装 Tensorflow 的条件:
numpy==1.16.1, future==0.17.1, mock==3.0.5, h5py==2.9.0, gast==0.2.2, keras_preprocessing==1.0.5, keras_applications==1.0.8, scipy==1.4.1 -
安装Tensorflow
使用pip3安装TensorFlow,该命令将安装与JetPack 4.4兼容的TensorFlow的最新版本:
sudo pip3 install --pre --extra-index-url https://developer.download.nvidia.com/compute/redist/jp/v461 tensorflow如果速度太慢可以pip暂时换源:(在上面命令后加 -i https://pypi.tuna.tsinghua.edu.cn/simple)
sudo pip3 install --pre --extra-index-url https://developer.download.nvidia.com/compute/redist/jp/v461 tensorflow -i https://pypi.tuna.tsinghua.edu.cn/simple等待一段时间后,Tensorflow就装好啦!!
-
安装Torch
使用pip3安装torch与torchvision
sudo pip3 install torch==1.8.1
sudo pip3 install torchvision==0.9.1
6. 性能设置
除了无桌面模式和swap虚拟内存外,还可以提高功耗和解除硬件限制来提高性能。
-
设置功耗模式: 查询现有模式
sudo nvpmodel -q设定高功率(10W)模式
sudo nvpmodel -m 0设定低功率(5W)模式
sudo nvpmodel -m 1
改变模式之后,可以再执行第一个”查询“指令,看看是否改变
-
解除硬件限制: 以前Jetson系列产品 ${home} 目录下,都会有个 jetson_clocks.sh 脚步,可以用来将性能压榨到最极致,而 Nano 的 {home} 目录找不到了。。。其实 jetson_clock 没有消失,只是藏起来了。您在任何地方,只要执行以下指令就可以解除硬件限制。
sudo jetson_clocks
7. OpenCV
安装比较麻烦,且容易失败,如无必要可继续使用原生opencv
-
卸载原生opencv
sudo apt-get purge libopencv* sudo apt autoremove sudo apt-get update sudo apt-get install -y build-essential pkg-config -
通过opencv本地包进行安装
* pip官网下载opencv-python=4.5.1.48 * 直接下载文件opencv_python-4.5.1.48-cp36-cp36m-manylinux2014_aarch64.whl * 本地安装完成后,安装numpy==1.16.1 -
通过opencv项目编译安装(不推荐)
安装v4l2
sudo apt install v4l-utils```
-
https://github.com/yqlbu/jetson-packages-family#opencv
- 列表中找到opencv并根据提示进行安装
- 其中opencv,opencv_contrib,opencv_extra 可以先下载到home目录下,以避免因网络不稳而无法安装 ```
安装脚本:
#!/bin/bash
# License: MIT. See license file in root directory
# Copyright(c) JetsonHacks (2017-2019)
# Modifier(c) Kevin Yu (2020)

echo -e "
+-------------------------------------------------------+
@@@ Welcome to OpenCV4.1-Jetson Installation Toolkit @@@@
|							|
|	  Select your Jetson DevKit Model		|
|							|
|	  1. Jetson-Nano				|
|	  2. Jetson-TX2					|
|	  3. Jetson-Xavier				|
|							|
+-------------------------------------------------------+
"

param (){
read -p '[BASH]  Put your Jetson model # here: ' NUM
if [ "$NUM" == '1' ] || [ "$NUM" == '2' ] || [ "$NUM" == '3' ]
then
	echo -e "[BASH]  You choose #$NUM."
	read -p '[BASH]  Do you wish to continue? (y/n) ' VAL
	#if y continue, else done
	if [ "$VAL" == "y" ]
	then
		echo -e "[BASH]  Installation will start in 3 seconds."
		sleep 3
 		# Jetson Nano
		if [ "$NUM" == '1' ]; then
			ARCH_BIN=5.3
 		# Jetson TX2
		elif [ "$NUM" == '2' ]; then
			ARCH_BIN=6.2
		 # Jetson AGX Xaviers
		elif [ "$NUM" == '3' ]; then
			ARCH_BIN=7.2
		fi
		start
	else
		echo "[BASH]  Installation ends..."
	fi
else
	echo "[BASH]  Please put the right # "
	param
fi
}

start (){
DOWNLOAD_OPENCV_EXTRAS=YES
WHEREAMI=$PWD
NUM_JOBS=$(nproc)
CLEANUP=true
PACKAGE_OPENCV="-D CPACK_BINARY_DEB=ON"
CMAKE_INSTALL_PREFIX=$INSTALL_DIR

echo "[BASH]  Installation start!"
sleep 2

# Print out the current configuration
echo "[BASH]  Build configuration: "
echo " NVIDIA Jetson Nano"
echo " OpenCV binaries will be installed in: $CMAKE_INSTALL_PREFIX"
echo " OpenCV Source will be installed in: $OPENCV_SOURCE_DIR"
if [ "$PACKAGE_OPENCV" = "" ] ; then
   echo " NOT Packaging OpenCV"
else
   echo " Packaging OpenCV"
fi

if [ $DOWNLOAD_OPENCV_EXTRAS == "YES" ] ; then
 echo "[BASH]  Also downloading opencv_extras"
fi

# Repository setup
sudo apt-add-repository universe
sudo apt-get update
# Download dependencies for the desired configuration
cd $WHEREAMI
echo "[BASH]  Install dependencies ..."
sleep 2
sudo apt-get install -y \
    build-essential \
    cmake \
    libavcodec-dev \
    libavformat-dev \
    libavutil-dev \
    libeigen3-dev \
    libglew-dev \
    libgtk2.0-dev \
    libgtk-3-dev \
    libjpeg-dev \
    libpng-dev \
    libpostproc-dev \
    libswscale-dev \
    libtbb-dev \
    libtiff5-dev \
    libv4l-dev \
    libxvidcore-dev \
    libx264-dev \
    qt5-default \
    zlib1g-dev \
    libwebp-dev \
    pkg-config

# We will be supporting OpenGL, we need a little magic to help
# https://devtalk.nvidia.com/default/topic/1007290/jetson-tx2/building-opencv-with-opengl-support-/post/5141945/#5141945
cd /usr/local/cuda/include
sudo patch -N cuda_gl_interop.h $WHEREAMI'/patches/OpenGLHeader.patch'

# Python 2.7
sudo apt-get install -y python-dev  python-numpy  python-py  python-pytest
# Python 3.6
sudo apt-get install -y python3-dev python3-numpy python3-py python3-pytest

# GStreamer support
sudo apt-get install -y libgstreamer1.0-dev libgstreamer-plugins-base1.0-dev

echo "[BASH]  Download sources ..."
sleep 2

cd $OPENCV_SOURCE_DIR
# git clone --branch "$OPENCV_VERSION" https://github.com/opencv/opencv.git
# git clone --branch "$OPENCV_VERSION" https://github.com/opencv/opencv_contrib.git

if [ $DOWNLOAD_OPENCV_EXTRAS == "YES" ] ; then
 echo "[BASH]  Installing opencv_extras"
 # This is for the test data
 cd $OPENCV_SOURCE_DIR
 # git clone https://github.com/opencv/opencv_extra.git
 cd opencv_extra
 git checkout -b v${OPENCV_VERSION} ${OPENCV_VERSION}
fi

# Patch the Eigen library issue ...
cd $OPENCV_SOURCE_DIR/opencv
sed -i 's/include <Eigen\/Core>/include <eigen3\/Eigen\/Core>/g' modules/core/include/opencv2/core/private.hpp

# Create the build directory and start cmake
cd $OPENCV_SOURCE_DIR/opencv
mkdir build
cd build

echo "[BASH]  Build from sources ..."
sleep 2

echo $PWD
time cmake -D CMAKE_BUILD_TYPE=RELEASE \
      -D CMAKE_INSTALL_PREFIX=${CMAKE_INSTALL_PREFIX} \
      -D WITH_CUDA=ON \
      -D CUDA_ARCH_BIN=${ARCH_BIN} \
      -D CUDA_ARCH_PTX="" \
      -D ENABLE_FAST_MATH=ON \
      -D CUDA_FAST_MATH=ON \
      -D WITH_CUBLAS=ON \
      -D WITH_LIBV4L=ON \
      -D WITH_V4L=ON \
      -D WITH_GSTREAMER=ON \
      -D WITH_GSTREAMER_0_10=OFF \
      -D OPENCV_DNN_CUDA=ON \
      -D WITH_QT=ON \
      -D WITH_TBB=ON \
      -D BUILD_opencv_python2=ON \
      -D BUILD_opencv_python3=ON \
      -D BUILD_TESTS=OFF \
      -D BUILD_PERF_TESTS=OFF \
      -D OPENCV_EXTRA_MODULES_PATH=../../opencv_contrib/modules \
      $"PACKAGE_OPENCV" \
      ../


if [ $? -eq 0 ] ; then
  echo "[BASH]  CMake configuration make successful"
else
  # Try to make again
  echo "[BASH]  CMake issues " >&2
  echo "[BASH]  Please check the configuration being used"
  exit 1
fi

# Consider the MAXN performance mode if using a barrel jack on the Nano
time make -j$NUM_JOBS
if [ $? -eq 0 ] ; then
  echo "[BASH]  OpenCV make successful"
else
  # Try to make again; Sometimes there are issues with the build
  # because of lack of resources or concurrency issues
  echo "[BASH]  Make did not build " >&2
  echo "[BASH]  Retrying ... "
  # Single thread this time
  make
  if [ $? -eq 0 ] ; then
    echo "[BASH]  OpenCV make successful"
  else
    # Try to make again
    echo "[BASH]  Make did not successfully build" >&2
    echo "[BASH]  Please fix issues and retry build"
    exit 1
  fi
fi

echo "[BASH]  Installing ... "
sudo make install
sudo ldconfig
if [ $? -eq 0 ] ; then
   echo "[BASH]  OpenCV installed in: $CMAKE_INSTALL_PREFIX"
else
   echo "[BASH]  There was an issue with the final installation"
   exit 1
fi

# If PACKAGE_OPENCV is on, pack 'er up and get ready to go!
# We should still be in the build directory ...
if [ "$PACKAGE_OPENCV" != "" ] ; then
   echo "[BASH]  Starting Packaging"
   sudo ldconfig
   time sudo make package -j$NUM_JOBS
   if [ $? -eq 0 ] ; then
     echo "[BASH]  OpenCV make package successful"
   else
     # Try to make again; Sometimes there are issues with the build
     # because of lack of resources or concurrency issues
     echo "[BASH]  Make package did not build " >&2
     echo "[BASH]  Retrying ... "
     # Single thread this time
     sudo make package
     if [ $? -eq 0 ] ; then
       echo "[BASH]  OpenCV make package successful"
     else
       # Try to make again
       echo "[BASH]  Make package did not successfully build" >&2
       echo "[BASH]  Please fix issues and retry build"
       exit 1
     fi
   fi
fi

# Install Python packages
sudo apt-get install -y libopencv-dev
sudo apt-get install -y libopencv-core-dev

# check installation
IMPORT_CHECK="$(python3 -c "import cv2 ; print(cv2.__version__)")"
if [[ $IMPORT_CHECK != *$OPENCV_VERSION* ]]; then
  echo "[BASH]  There was an error loading OpenCV in the Python sanity test."
  echo "[BASH]  The loaded version does not match the version built here."
  echo "[BASH]  Please check the installation."
  echo "[BASH]  The first check should be the PYTHONPATH environment variable."
fi

echo "[BASH]    Installation completed ..."
sleep 2

}

# Execute
ARCH_BIN=0
INSTALL_DIR=/usr/local
OPENCV_SOURCE_DIR=$HOME
OPENCV_VERSION=4.1.1
param
参考:https://blog.csdn.net/qq_68080661/article/details/132057624
常见问题
-
Illegal instruction (core dumped)
-
终端运行
sudo vim ~/.bashrc -
末尾添加环境变量,保存并关闭文件
export OPENBLAS_CORETYPE=ARMV8 -
终端运行
source ~/.bashrc
-
-
Cannot identify device ‘/dev/video…
* pip官网下载opencv-python=4.5.1.48
* 直接下载文件opencv_python-4.5.1.48-cp36-cp36m-manylinux2014_aarch64.whl
* 本地安装完成后,安装numpy==1.16.1
https://blog.csdn.net/qq_56548850/article/details/123967404
https://blog.csdn.net/weixin_45235219/article/details/128840418